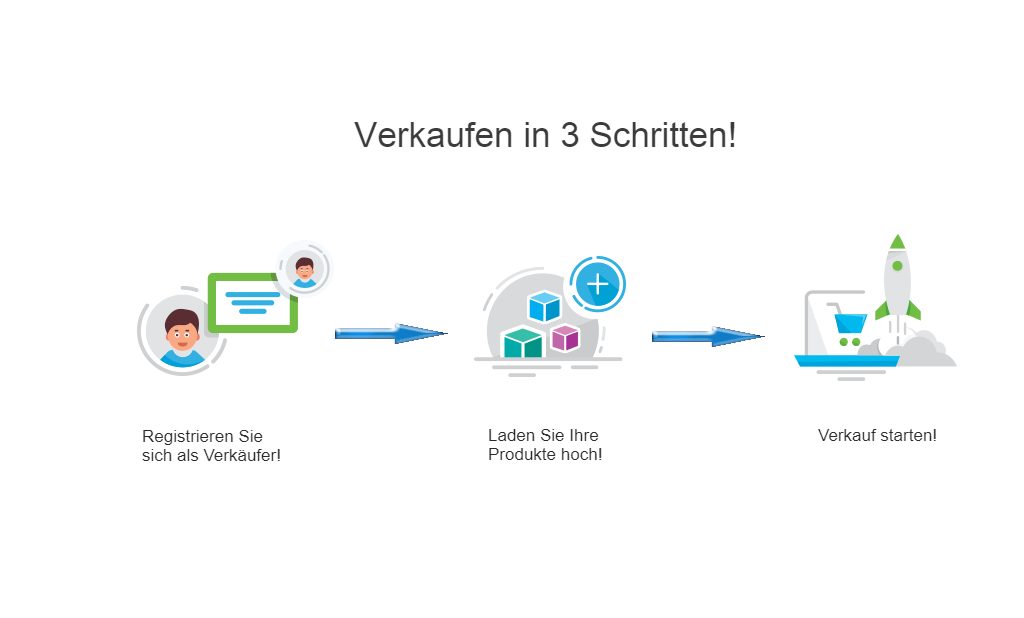
- Click here to register as seller
- You can then follow the Store Setup Wizard to complete your store setup or return later to view the “Welcome Back!” follow the steps described in the folder
- Follow the steps above accordingly; enter all the required information, that’s all! Do you still need help? Call our hotline.
Get to know management tools
Setup shop
Your shop is the place where you display your goods in an interactive way. Through the shop, the customer receives an overview of your products, contact information, store address and whatever else is important at a glance. Once set up, you can view your store. To do this, go to Seller Dashboard -> Visit Shop. It will look like this:

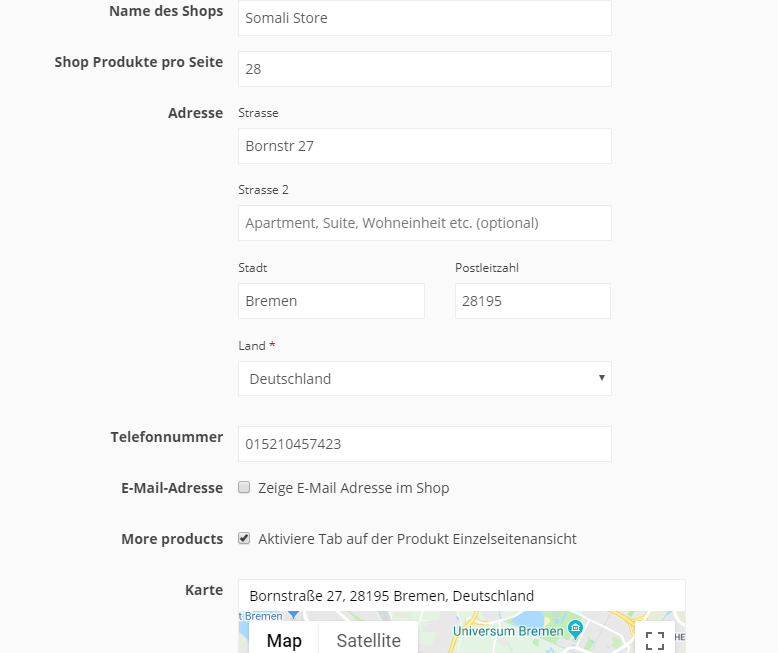
To set up your shop, go to Seller Dashboard -> Settings
Shop Banner: The Shop Banner is a large format image that represents your concept and your goods. The banner has a size of 625 x 300 pixels, we recommend PNG or JPEG for a good result. The file cannot be larger than 16 MB. A good interactive image grabs the customer’s attention. (As shown in Figure No. 1 below).

Profile picture: We recommend using a picture of yourself or your logo for better recognition by the customer. The recommended size is 150 x 150 pixels.
Contact Information: For better contact between seller and customer, we have integrated a form with contact information when setting up the shop. Here you will find the telephone number, email address and store or postal address, which is also displayed on the map.
General terms and conditions: Here you decide whether your general terms and conditions should be displayed or not.

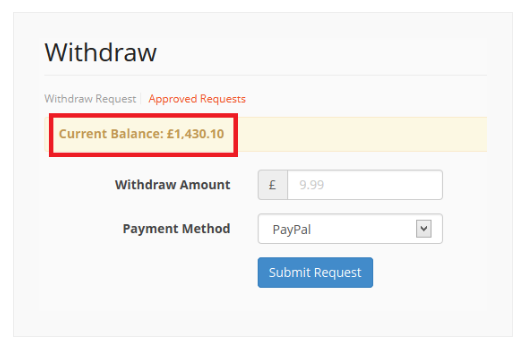
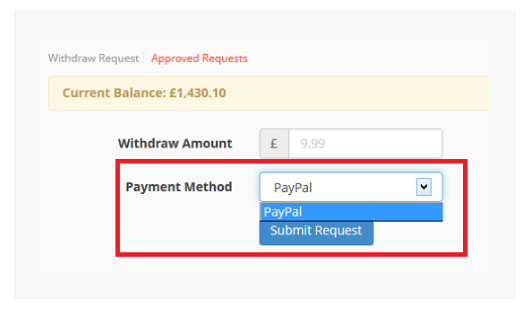
Here you enter the desired payment method and the required data.
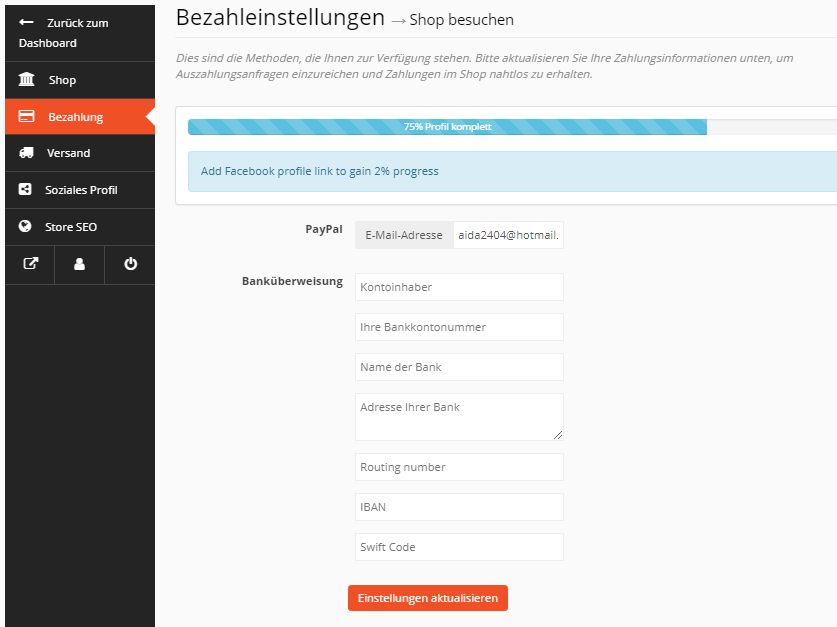
If you click Shipping, you will go to the following page

- Activate shipping: Tick this option to be able to provide further information about shipping.
- Standard shipping costs: Here you select the basic rate that will be used for every product you create, unless you specify otherwise.
- Additional price per product: enter the additional price that will be added when customers purchase an additional different product. As an example: You sell bananas and oranges. The base price remains unchanged if someone buys more than one banana. This price is added if the customer buys additional oranges.
- Additional costs per piece: here you enter the additional price that should be charged if customers buy more than one piece of the same product. In the previous example, this means the additional price for each additional banana.
- Processing time: describes the processing time normally required for shipping and has nothing to do with the calculation of postage costs.
- Shipping conditions: A free text field in which you can enter your shipping conditions.
- Right of withdrawal / cancellation policy: in a free text field in which you can enter your return conditions
- Shipping from: select item location
- Ship to: Select which countries you will ship to. Once you have selected a country, you can select the states in another selection field.
- Costs: Enter the basic tariff for the respective country here.
- Add a location: If you want more than one destination country entered, click this button.
Link your shop to your social networks by copying the links into the appropriate fields

Add product
Go to the seller Dashboard -> Products and then click the “Add product” button in the top right corner.
The general information about a product is the name, price, product description and product image

- Product image: The product image should be 600 x 600 pixels and of high quality. We recommend a simple, preferably white background.
- Product Category: The product must be assigned to a category (see list in the appendix) and only one category can be selected. Select the relevant category from the list provided.
- Tags: are characteristic features that can be used to display your product under various search options (e.g. women, jacket, blazer, long sleeve, fashionable, sporty, cotton, etc.)
Enter a few letters of the desired property and then select from the options offered by pressing the down arrow key ↓ or by clicking. If the product feature you want is not included in the selection, please contact Afrosmartshop so that we can add the desired keywords to the list.
- Product Details: We recommend writing as detailed a product description as possible in this field to make the purchase decision easier for the buyer.
Please note that some options such as price reductions or similar are only possible after saving (clicking on the “Add product” button).
To edit a saved product, go to “Seller Dashboard” and click “Products”, then you will get a list of all your saved products. Place the cursor on the product you want to edit and wait until the “edit” button appears, then click it.
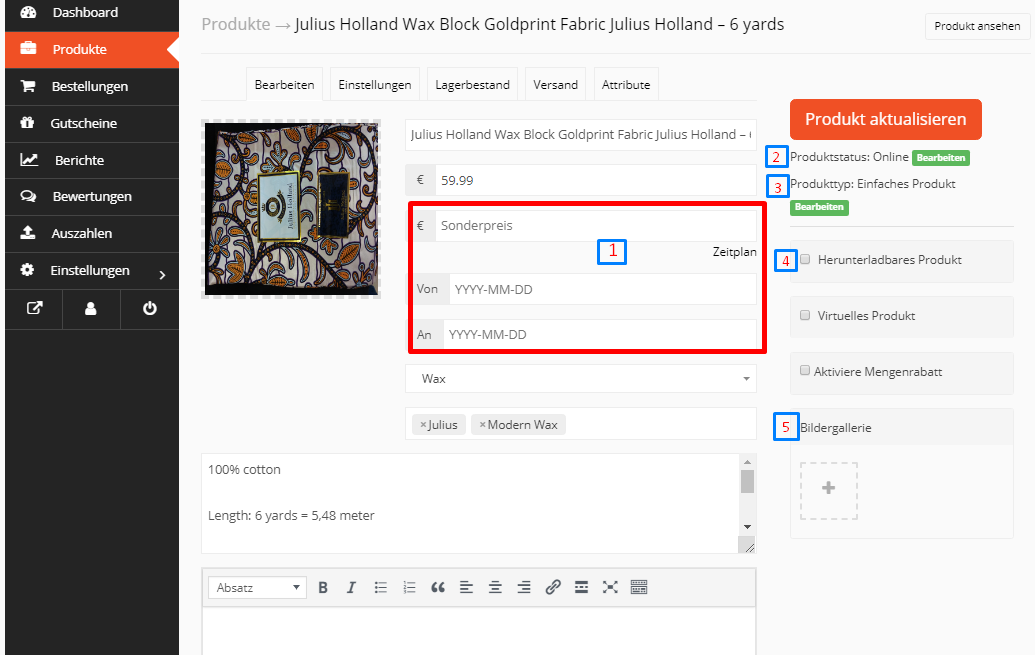
- Promotional price: You can optionally enter a price reduction here. You can also limit these times using the schedule. Then enter the start and end dates in YYYY-MM-DD format.
- Product status: choose between draft or online. Only products with the status online are visible to customers.
- Product Type: Unless your product comes in different varieties (like fashion), it’s probably a simple product. Then you don’t have to fill out anything else here!
If, for example, you sell fashion with different colors and sizes, click on edit and change the product type to “Variable product”. Then enter the attributes such as size and/or color etc. and after saving you can create the different variants using the “Variations” button. For more information, please read Attributes and Variations below.
- Downloadable product: If you sell a downloadable product such as e-books, audios, photos, software or music, please check the box next to downloadable product. Additional fields then appear in which you can enter your product, determine how often it can be downloaded after purchase or when the download option expires.

Click Add File and additional fields will appear as shown in the graphic above. Under Name you enter the name under which the product should be saved by the customer. You can choose this yourself. For example, if you saved your original under “new-album-updated-jan-12.zip”, you might want the customer to save it only under “New Album”. Then enter this here.
If you are offering the file from your own computer, click Choose File and select it. You can also offer the file via Dropbox, Google Drive or another file hosting website.
- Image gallery: You can use this button to upload additional images of the product
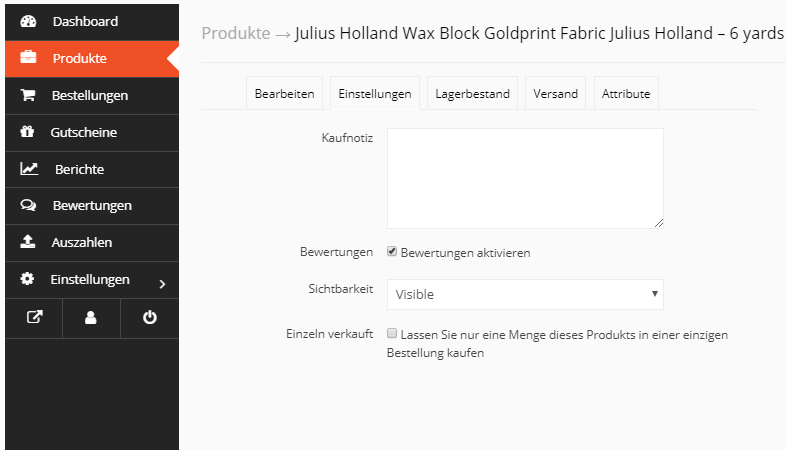
- Purchase Note: If you would like the customer to receive a custom message immediately after purchase, you can enter it here
- Reviews: Here you can allow/activate or reject product reviews
- Visibility:The option defines the visibility of a product. “Visible” is preset as the default and includes the greatest possible visibility of the product. However, if you would like your product to only be displayed in the search (Search) or only in the category view (Catalog), please select the appropriate settings. You can hide your product under Hidden if, for example, you currently have no items in stock and are not using inventory management. Your product will then not be displayed. This will prevent customers from being shown the product and unable to deliver it. Once you have it back in stock, you can simply change the status instead of having to re-enter the entire product.
- Sold individually: select if the customer is only allowed to buy one copy of the offered product per purchase.
If you want to use inventory management, you have the opportunity to do so here
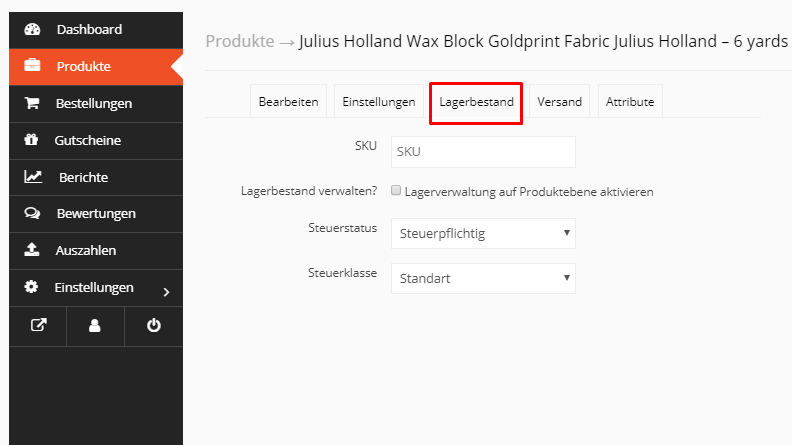
What is SKU?
SKU stands for Stock Keeping Unit and is, in a sense, the item position and is tied to a specific storage location.
Enable inventory management at product level
Choose this option to prevent more of a product from being ordered than is available. In the Stock quantity field, enter the existing number of the item, e.g. 10. If 10 items were ordered, a corresponding message appears that the item is sold out (Sold Out). Under Allow backorders you can enable (allow) or reject pre-orders.
If you have made the default settings under Seller Dashboard -> Settings -> Shipping, this applies to all your products. In this case you do not have to make any entries in this section.
But for some products you may want to adjust the shipping cost. You have the opportunity to do that here.
For existing products – navigate via Dashboard -> Edit Products -> and go to Shipping there
When creating a new product – Dashboard -> Products -> Add new product -> you can change the preset values after entering the basic information under Shipping.
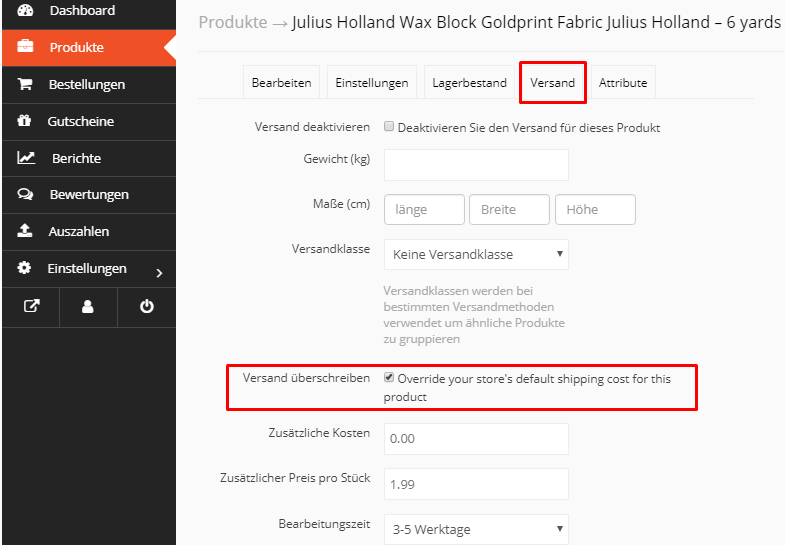
Click Override Shipping and you can specify additional shipping costs for the product. You can add a positive or negative amount depending on whether shipping this product is more expensive or cheaper than the preset price.
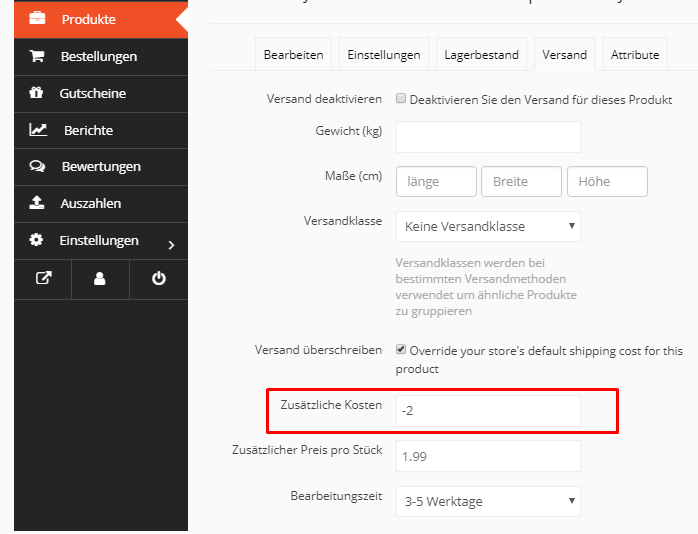
Let’s assume your base price is set to 5 euros but you would send bananas for 3 euros. Then write -2 in Additional Cost as shown above

In the image above you can see that with a base value of 5 euros and an additional price of 3 euros, the total price is 8 euros. Prices can then be specified for individual states. For example, if you set €2 for Berlin, Germany, the total cost for shipping to Berlin is €8 + €2 = €10.
If you are selling a simple product, you can skip this section completely. But for downloadable products or items that come in different sizes, colors or patterns, you should read this section carefully.
Create a variable product
To create a variable product, you can create a new product or revise an existing one.
Go to Dashboard-> Products, then select either add new product oder edit an existing product.
Step I. Select the product type
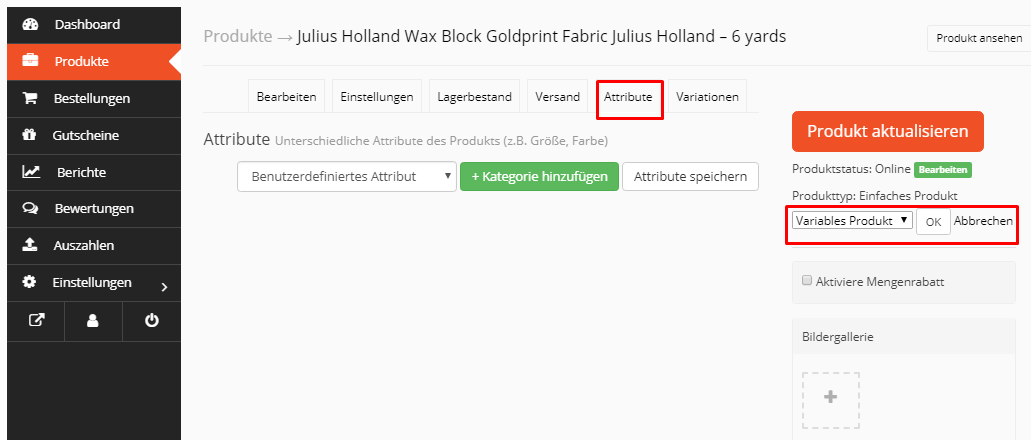
Select Variable Product under the Product Type selection and confirm with OK.
Step II. Add attributes for variations
This action is divided into three steps, as shown in the screenshot.

- Select the variable attribute from the selection menu or name it yourself under Custom Attribute.
- Click Add Category
- Then check Used for variations and enter the variants of the attribute. Write a variant in the free field and click + to add more. Do this with all variable characteristics and save under Save Attributes
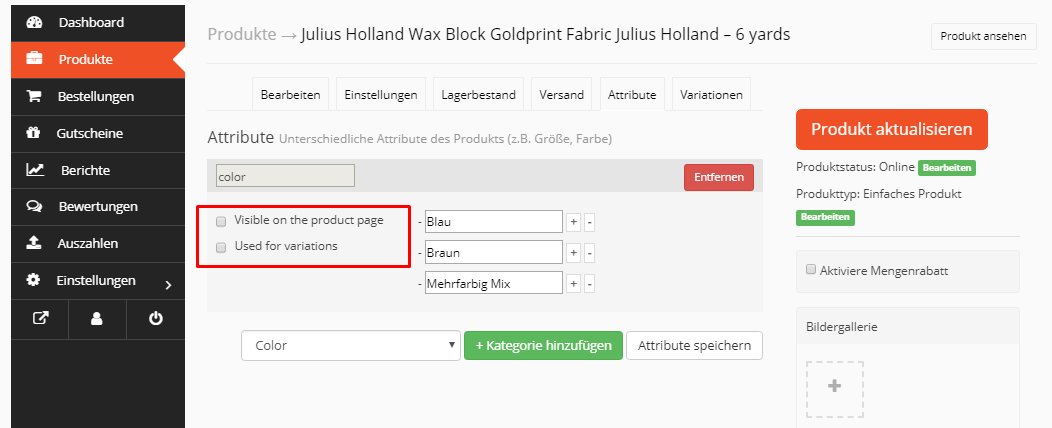
If you want the different attributes to be visible on the product page, check Visible on the product page.
For example: let’s say you want to sell a t-shirt that you have in four different colors (black, blue, green and white) and each color in 4 different sizes (S, M, L, XL). List each one Attributes as described above and after that you will get an image like the following:

You can now continue adding (variations).

- Under the Variations tab you can add variations or link the characteristics previously entered under Attributes to link variations

- Choose the characteristics for your variations
- Complete the available information. The only required field is Regular Price
- Save your entries via Update Product.
Make default setting

We recommend making default settings for variations. In the example shown, we used the blue T-shirt in size M, which means that this is the first thing the customer sees when they access the page. This also makes it possible for the “Add to Cart” button to appear automatically on pages with variable products. However, you do not have to make any standard settings, so the customer has to select the color and size directly. Setting such a standard setting is only possible if there are at least two variations.
Linking variations
You can add as many variations and features as you like. To generate the different variations from the characteristics entered, click Link all variations. The system will then create any variations resulting from the combination of the different features. In the next step you can then enter the price and other product details such as the number available for each variation.
If you want to remove variations, click the corresponding button.
You also have the option to upload an image of the respective variant, or you can decide whether you want to use stock status and stock quantity or mark downloadable products as such.
Variation data
Below you will find the different terms that you will see under variants:
- Enabled: activate or deactivate the variant.
- Downloadable: Indicate whether the product is a downloadable product.
- Virtual: removes shipping options for non-physical products and those that do not ship
- Regular Price: (must be filled in) – determines the price of the variant
- Sale Price: (optional) – If you would like to offer this variant as a special offer
- Tax status: Taxable, shipping only, none.
- Tax class: Tax rate of the variant. Makes sense if you have variants that are taxed at different tax rates.
- Downloadable Files: if you chose Downloadable, this field will appear. Enter the downloadable file here.
- Download Limit: If you have selected Downloadable, enter here how often the customer can download the product. Leave the field blank for unlimited.
- Download Expiry: If you have chosen Downloadable, enter the number of days that the product will be available for download after purchase.
Inventory
- SKU: If you use SKUs, you can enter them here.
- Manage Stock: If you also want to use inventory management at the variant level
- Stock Quantity: is displayed if you have selected Manage Stock. Enter the existing number of the corresponding variant.
- Allow Backorders: Here you decide whether you want to allow pre-orders.
- Stock Status: Enter the status of your inventory of the variant.
- Sold Individually: Only one item can be purchased by the customer per purchase.
Shipping/ Delivery
- Weight: Weight of the variant. If you do not enter anything, the default weight will be used.
- Dimensions: Height, width and length of the variant. If you do not enter anything, the default weight will be used.
- Shipping class: The shipping class influences the shipping costs. Only enter this if you want to deviate from the standard setting.
Dashboard
What is the Dashboard?
Dashboard is the area where the seller gets an overview of their activities on Afrosmartshop. Here you can also view notifications and announcements from Afrosmartshop that are only intended for the respective seller. The dashboard is divided into six units, which are explained in more detail below. The seller can manage his products and his shop in the respective areas.

Part 1
Here the seller sees the total amount of all orders (sales), the total amount of successfully completed orders (earnings), how many customers have visited his shop since it was set up (views) and the number of orders.
Part 2
This section shows the total number of orders received and their status. The colored pie chart provides an overview of the different statuses. The green area shows the ratio of completed orders to those in progress (blue), on hold (yellow) or canceled (red).
Part 3
This section shows a graph of total sales based on daily sales over a month.
Part 4
Here the seller can see the number of reviews received, how many of them are in progress, marked as SPAM or have been moved to the trash.
Part 5
This section contains information about the number of total products offered by the seller, how many of them are online/live or offline, and the number of products that have pending reviews.
Part 6
Here the seller can see all notifications and announcements from Afrosmartshop.
Manage orders
Order notification
You will receive a notification by email as soon as one of your products has been ordered. This is an automatic email to which you cannot reply (no-reply message).
Order overview
You can get an overview of the orders by clicking on the Orders sub-item under Dashboard. The page shows the number of orders, total amount, order status, customer information, order date and order action. Under this point you can view details of the respective order, manage the status of the order and delete the order.
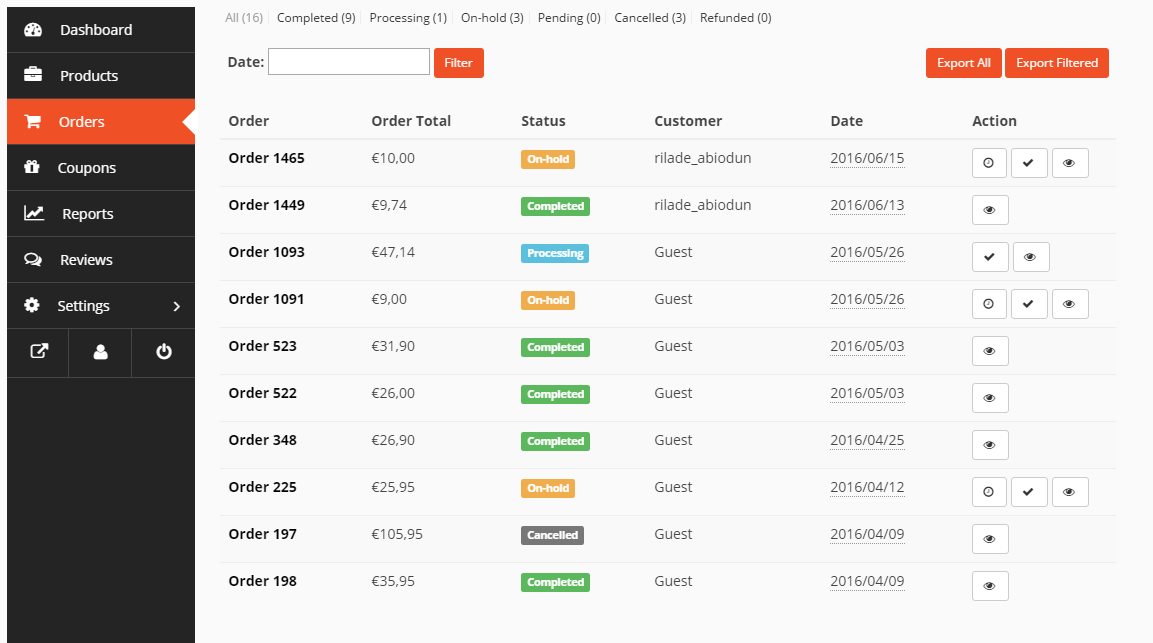
Order Status
You can see and change the status in the order overview. As an abbreviation there are the buttons under order action.

Refund
You can request a refund for a completed order if necessary. By clicking on Refund, additional processing fields appear where the amount and reason for the refund can be entered, as shown below.
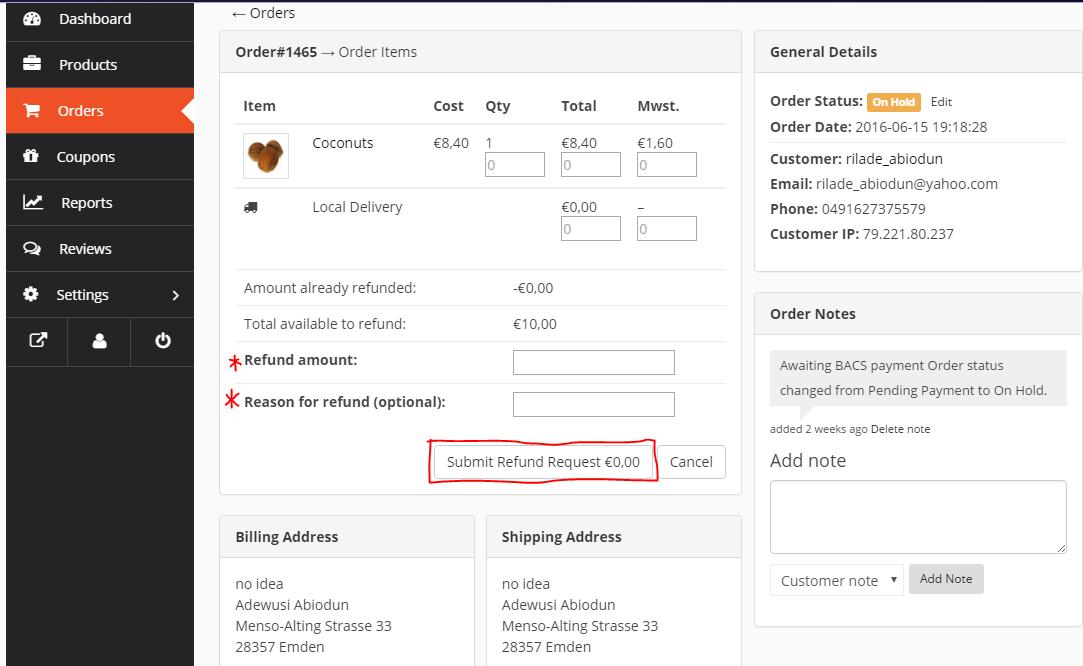
Order notes
Changes in order processing are displayed here, such as a status change. You can also enter processing instructions yourself under Add note, e.g. date of receipt of payment, customer contacts or similar. In this case, select the Private note option. If Customer note is selected, the customer will also receive the notes by email.

Download Permissions
For downloadable products, the seller can authorize the download. He can add or delete files for download and control access for the customer.

Create vouchers
Giving vouchers to customers could be a very good business development strategy. Seller could give vouchers as a special offer or during special promotions.
To create a voucher, go to the Vouchers button under Dashboard and then click Add new voucher. Enter the name, type and products for which the voucher is intended, add any other necessary information and save via Create vouchers.
 Fixed Amount Discount: The customer will receive the fixed amount stated on the voucher, regardless of the total value of his order.
 Product Percentage (%) Discount: The customer receives the percentage of the total amount specified on the voucher.

To create a voucher, go to the Vouchers button under Dashboard and then click Add new voucher. Enter the name, type and products for which the voucher is intended, add any other necessary information and save via Create vouchers.
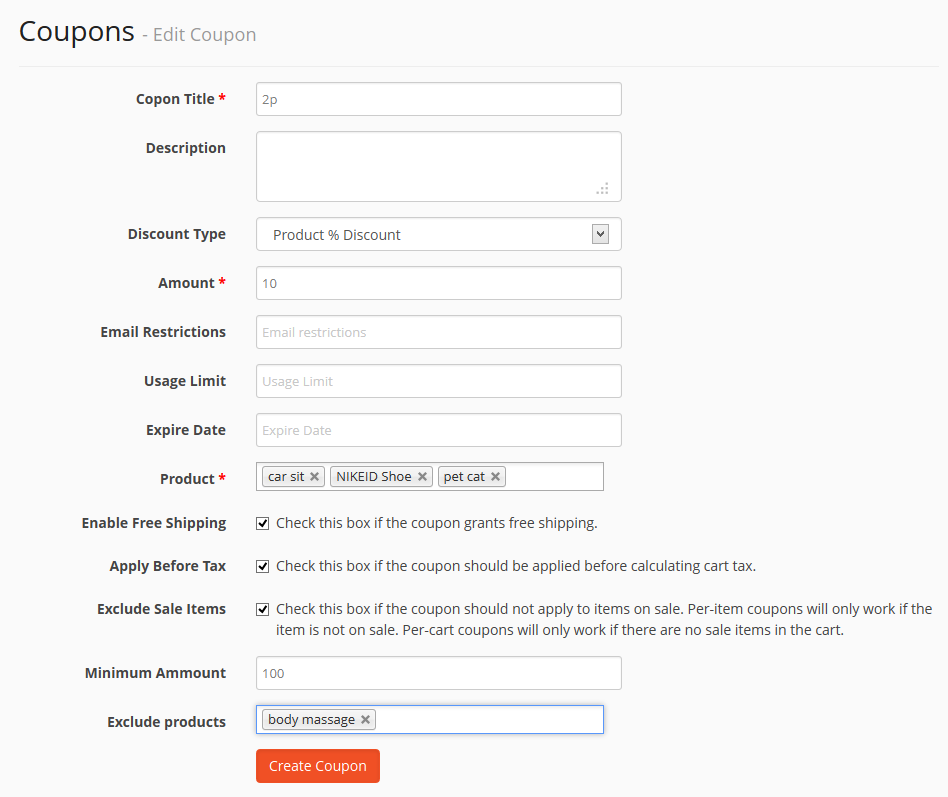
Fixed Amount Discount: The customer will receive the fixed amount stated on the voucher, regardless of the total value of his order.

Product Percentage (%)Discount: The customer receives the percentage of the total amount specified on the voucher.

Manage product reviews
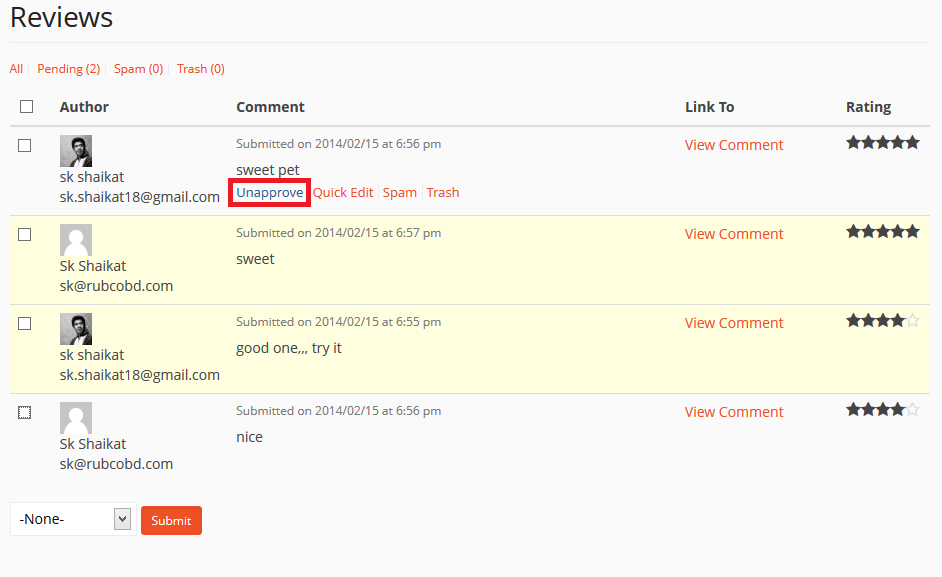
Sellers can view all customer reviews of their products under Dashboard → Reviews. Here you can see comments and customer ratings. It is possible to manage the reviews and enable or block them from being displayed on the product page. You can also mark them as trash or spam if necessary.

If a seller does not want a review to be displayed, they can mark it as spam by selecting mark as spam in the selection list.
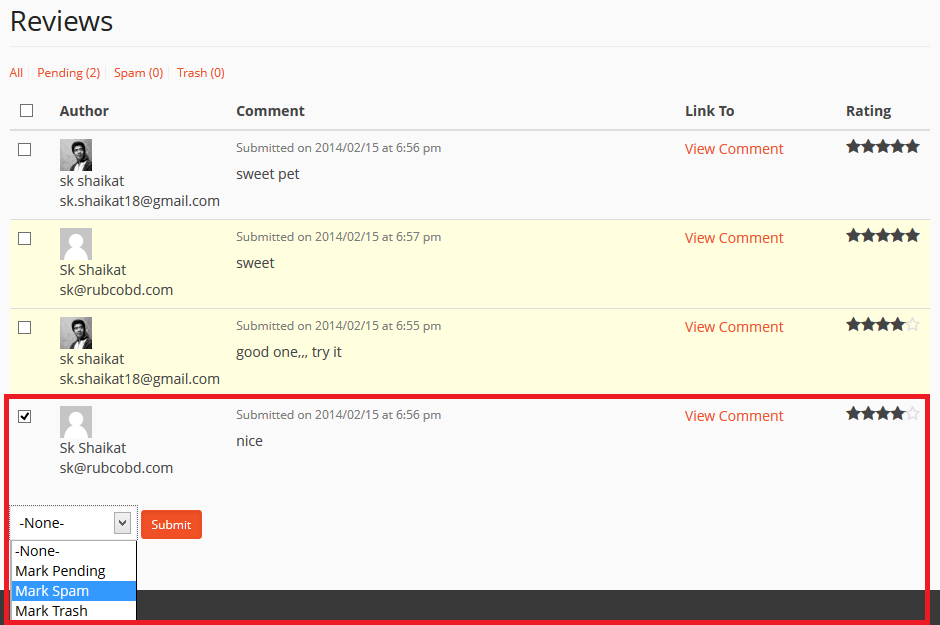
If a seller would like to delete reviews, they can dispose of this using the mark as trash selection.

If a seller wants to mark reviews as unapproved, they can do so simply by clicking the unapprove button that appears when you browse to the relevant review.
Generate income report
To view sales statistics go to Dashboard -> Reports Overview provides an overall overview of sales. In the upper area you will find a selection between “sales per day”, the “most frequently sold products” (top sales) and the products that “achieve the greatest sales” (peak sales).
This option provides a daily overview. This shows the daily sales over a certain period of time, the average value per day, the total number of orders, the total number of items purchased, details about vouchers used and shipping costs.
 Here you can see your best-selling products with the respective number of items sold with a graphical representation.
 Here you can see the products through which you achieved the most sales with the respective individual price.

Ship orders
If your products are in our fulfillment center, you don’t have to worry about it. Your product will be packed and shipped by experts.
However, appropriate safety packaging material must be used to package your product to prevent the product from being damaged during transit after an order has been placed.
Delivery note and invoice
It should be noted that an invoice (see 1 in the screenshot) and a shipping label (see 2 in the screenshot) must be enclosed for each package you wish to ship and these can be found here:

Sendungsverfolgung
To ensure your order is trackable, you need to add the tracking details of your submitted order as follows: In the dashboard, click the order button and select the order you want to add details to, then click first 1-Tracking-Number fill out the form and then click 2-Add tracking detailsto submit the details. Immediately after clicking Add tracking details, an automatic message is sent to the customer.

Seller Fees
1. Registration fees
These registration fees are due for all sellers who use Afrosmartshop for the first time. You only pay once. After that, you can sell any product of your choice on Afrosmartshop.com in accordance with our policies without any additional fees.
| Retailer | Provider location |
| 0 euros (including VAT) | Africa |
| 0 euros (including VAT) | Everywhere else |
2. Sales commission
The sales commission is (20%) of the total amount paid by the customer at checkout (This fee includes payment fees).

